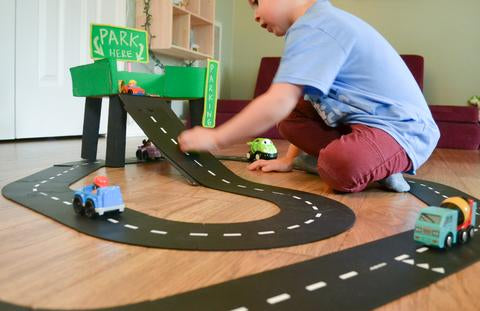

Hello! My name is Emily Limer and I am so excited to be sharing this guest post with Waytoplay toy roads today! I am a mom of 2 and a preschool teacher in North Carolina. One of the things my kids and I love to do is build things from cardboard and other recyclables that we can use to play with our favorite open-ended toys! It's such a budget-friendly way to extend play. When I saw our new Waytoplay toy roads I felt like they would be so much fun to use with a DIY parking garage. I love the flexible nature of the roads, so we built a long ramp to roll the cars down, which my son loves. Keep reading below for a full tutorial to make your own parking garage!
Materials Needed:
-1 medium-sized, shallow cardboard box
-Extra cardboard long enough to create a ramp
-Clear packaging tape or duct tape
-4 recycled cardboard tubes
-Hot glue gun
-Scissors or a box cutter
-Paint (acrylic paint or a high-quality washable paint will work!)
Directions:
Step 1: Begin constructing the top of your parking garage. Cut an opening in the side of your cardboard box where you would like to attach your ramp. Make sure that the opening is slightly wider than one of your Waytoplay roads!

Step 2: Tape your cardboard ramp to the bottom of the box, lining it up with your opening. You can put our tape on the bottom of the box and ramp - this way you won’t be able to see it when you're finished construction! I used a long piece of cardboard for the ramp that was just a bit wider than the roads. Once you have added legs to your parking garage, you can trim the ramp if it is a little too long.

Step 3: First, make sure that your four cardboard tubes are all the same length. Use scissors to trim them as needed. Flip your box upside down. Use hot glue to attach the four cardboard tubes to the four corners on the bottom of your box. Run a bead of glue around the rim of the tube, press firmly in place on the box and hold it for a few seconds as it dries. Once all four legs are attached, flip the parking garage back over and check to see if you like the length of your ramp. Use scissors to shorten the ramp, if desired.

Step 4: Paint your parking garage! My son wanted to paint ours green. We used black paint for the legs and the ramp, too! We used washable paint on ours (so that he could help), but acrylic paint would also work. Cardboard does have a tendency to curl some when painted. To help avoid this, keep the coat of paint as thin as you can. If the ramp curls some, you can help correct this by painting one coat of paint on the other side of of the ramp!

Step 5: If you’d like, you can use extra scraps of cardboard to make some signs for your parking garage. We used chalk crayons to write on our signs and hot glued pipe cleaners around the edges to dress them up a bit. Once the signs were done, I hot glued them onto the parking garage and we were ready to play!

This guest post is by Emily Limer. You can follow her on Instagram @makingwithmommy for more craft and play ideas!
Be sure to check out the Waytoplay Pinterest board with more cardboard DIY ideas to use with your Waytoplay roads!


